지난 글에서 Django 의 모델 필드 중 FileField 에 대해서 알아보았다. FileField 는 필드에 파일을 연결하고 이를 저장하는 기능을 하는 타입으로 이 글에서는 이 필드를 사용하여 파일을 저장해보려한다.
FileField 사용예제
Django model 에서 FileField 를 사용하여 파일을 저장하는 예제이다.
먼저 장고의 settings.py 에서 FileField 의 파일을 저장할 기본 경로와 URL 인 MEDIA_ROOT 와 MEDIA_URL 값을 저장해준다.
# settings.py
MEDIA_URL = '/media/'
MEDIA_ROOT = os.path.join(BASE_DIR, "media")
그 다음 FileField 필드를 가지는 django model 클래스를 정의했다. 아래와 같이 title 과 upload_file 두가지 필드를 가지며, 이 중 upload_file 이 FileField 타입이다. 이때 upload_file 에서 upload_to 옵션을 통해 파일 저장위치를 uploads 디렉토리로 지정한다.
class FileFieldDocument(models.Model):
    title = models.CharField(max_length=100)
    upload_file = models.FileField(upload_to='uploads/')
이제 FileFieldDocument 클래스를 통해 객체를 생성하고 파일을 업로드하는 코드를 작성했다. ContentFIle 타입으로 hello.txt 파일 객체를 생성하고 이를 FileFieldDocument 모델의 upload_file 필드에 저장했다.
# Hello 라는 내용을 가지는 hello.txt 파일 객체 생성
file = ContentFile(b"Hello", name="hello.txt")
# hello.txt 를 포함하는 FileFieldDocument 객체 생성 및 저장
doc = FileFieldDocument(title="Test 1", upload_file=file)
doc.save()
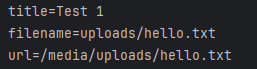
print(f"title={doc.title}")
print(f"filename={doc.upload_file.name}")
print(f"url={doc.upload_file.url}")
위 코드의 출력 결과는 다음과 같다. 파일의 name 은 FileField 의 upload_to 경로와 파일의 이름을 합한 uploads/hello.txt 를 반환했다. url 속성은 MEDIA_URL 의 값인 /media 와 파일 경로를 합한 /media/uploads/hello.txt 를 반환했다.
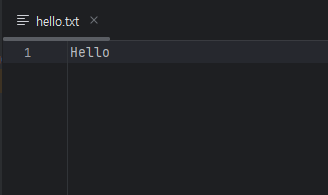
코드를 실행하고 나면 해당 경로에 업로드한 파일이 생성된다. 아래와 같이 Hello 라는 내용을 가진 media/uploads/hello.txt 파일이 생성되는 것을 확인할 수 있다.

'Framework > Django' 카테고리의 다른 글
| [Django] Django app 생성 (0) | 2025.12.07 |
|---|---|
| [Django] Django 설치 와 project 생성 (0) | 2025.12.06 |
| [Django] Django Model Field - FileField (1) (2) | 2025.08.08 |
| [Django] select_related() 와 prefetch_related() (1) | 2025.06.26 |
| [Django] Django 배포 - wsgi vs asgi (1) | 2024.11.16 |

